[iOS] UIPickerView 써보기
[AppJam 회고 - 03] UIPickerView 써보기
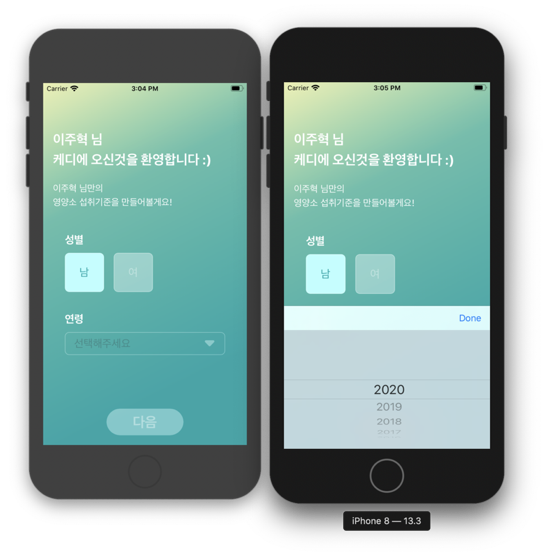
앱잼에서 사용자의 출생연도를 입력 받아야 할 때가 있었다. Date Picker로 좀 더 자세한 생년월일을 받을 수도 있었지만 자세하게 받을 필요가 없었기 때문에 출생연도만 받는 걸로 합의를 봤었다.
그래서 Date Picker의 부모 클래스? 라고도 할 수 있는 Picker View를 살짝 커스텀 해서 사용해 보았다.
먼저 Picker View를 하나 생성하여 Text Field의 input view 로 설정한다. 또한 커스텀을 위해서 Picker View의 delegate 와 dataSource 도 지정해주어야 한다.
func createYearPicker(){
        let yearPicker = UIPickerView()
        yearPicker.delegate = self
        yearPicker.dataSource = self

        userAgeTxtField.inputView = yearPicker
}
또 편한 입력을 위해 ToolBar도 설정해 주었다.
func createToolBar(){
        let toolBar = UIToolbar()
        toolBar.sizeToFit()

        let doneBtn = UIBarButtonItem(title: "Done", style: .plain, target: self, action: #selector(SurveyInfoVC.dismissKeyboard))
        let flexibleSpace = UIBarButtonItem(barButtonSystemItem: .flexibleSpace, target: self, action: nil)
        toolBar.setItems([flexibleSpace,doneBtn], animated: false)

        userAgeTxtField.inputAccessoryView = toolBar
    }
done 버튼을 추가하여 액션을 지정해 주고, 오른쪽 끝에 있는게 좀 더 편의성이 있지 않을까 해서 flexibleSpace를 생성해서 toolBar의 아이템으로 설정하였다.
이렇게 지정한 뒤에 Delegate와 DataSource에 Picker View 안에 제공할 선택지와 선택했을 때 이벤트를 지정해주면 끝이다.
DataSource 프로토콜을 먼저 살펴보면
    // returns the number of 'columns' to display.
    @available(iOS 2.0, *)
    func numberOfComponents(in pickerView: UIPickerView) -> Int

    // returns the # of rows in each component..
    @available(iOS 2.0, *)
    func pickerView(_ pickerView: UIPickerView, numberOfRowsInComponent component: Int) -> Int
열의 개수, 즉 선택할 속성을 정할 수 있고 각 속성의 행의 개수도 지정할 수 있다. 따라서 출생연도만을 받기 때문에 컴포넌트의 갯수는 1이고 출생 연도 선택지로 미리 만들어 놓은 배열의 count를 리턴하도록 하였다.
extension SurveyInfoVC: UIPickerViewDataSource{
    func numberOfComponents(in pickerView: UIPickerView) -> Int {
        return 1
    }

    func pickerView(_ pickerView: UIPickerView, numberOfRowsInComponent component: Int) -> Int {
        return bornInYearList.count
    }
}
다음은 Delegate 프로토콜이다.
    // returns width of column and height of row for each component.
    @available(iOS 2.0, *)
    optional func pickerView(_ pickerView: UIPickerView, widthForComponent component: Int) -> CGFloat

    @available(iOS 2.0, *)
    optional func pickerView(_ pickerView: UIPickerView, rowHeightForComponent component: Int) -> CGFloat


    // these methods return either a plain NSString, a NSAttributedString, or a view (e.g UILabel) to display the row for the component.
    // for the view versions, we cache any hidden and thus unused views and pass them back for reuse.
    // If you return back a different object, the old one will be released. the view will be centered in the row rect
    @available(iOS 2.0, *)
    optional func pickerView(_ pickerView: UIPickerView, titleForRow row: Int, forComponent component: Int) -> String?

    @available(iOS 6.0, *)
    optional func pickerView(_ pickerView: UIPickerView, attributedTitleForRow row: Int, forComponent component: Int) -> NSAttributedString? // attributed title is favored if both methods are implemented

    @available(iOS 2.0, *)
    optional func pickerView(_ pickerView: UIPickerView, viewForRow row: Int, forComponent component: Int, reusing view: UIView?) -> UIView


    @available(iOS 2.0, *)
    optional func pickerView(_ pickerView: UIPickerView, didSelectRow row: Int, inComponent component: Int)
다양한 메소드들 이있는데 대략적으로 소개하자면 각 컴포넌트의 너비를 지정하거나, 행 별로 높이를 지정할 수 있고, 각 행의 들어갈 title 또는 AttributedTitle을 넣을 수 있고, 이미지뷰나 커스텀한 UIView를 넣을 수도 있다고 한다 ..! 마지막으로 선택했을 때의 이벤트를 지정할 수도 있다.
내가 필요한 건 간단한 커스텀이였기 때문에 몇가지만 사용하였다.
extension SurveyInfoVC: UIPickerViewDelegate{
    func pickerView(_ pickerView: UIPickerView, titleForRow row: Int, forComponent component: Int) -> String? {
        return "\(bornInYearList[row])"
    }

    func pickerView(_ pickerView: UIPickerView, didSelectRow row: Int, inComponent component: Int) {
        selectedYear = "\(bornInYearList[row])"
        …
    }
}
먼저 각 행에 들어갈 Title을 설정하였는데 이 전에 설정한 배열로 지정해 주었고, 선택 값을 다른 변수에 저장해 주는 이벤트도 지정해 주었다.
#iOS/AppJam_회고