[iOS] 여러가지 TableView, CollectionView 쓰기
앱 개발을 하면서 TableView(이하 ‘TV’) 또는 CollectionView(이하 ‘CV’)를 쓰는일이 굉장히 많습니다. 하나의 화면 안에서도 여러가지를 사용할 수도 있는데요.
오늘은하나의 ViewController(이하 ‘VC’) 안에서 두개 이상의 TV 또는 CV 를 사용하는 경우에 대해 알아 보겠습니다.
보통 TV, CV 를 사용할 때 VC 의 Extension으로 Delegate 와 DataSource 를 추가하여 함수 오버라이드 통해 쓰는 경우가 많습니다.
//
//  ComponentProductVC.swift
//  CareDirection
//
//  Created by 이주혁 on 2019/12/26.
//  Copyright © 2019 SwiftHelloWorld. All rights reserved.
//
import UIKit

class ComponentProductVC: UIViewController {
    …
}

extension ComponentProductVC: UITableViewDelegate{
    func tableView(_ tableView: UITableView, didSelectRowAt indexPath: IndexPath) {
        …
    }
}

extension ComponentProductVC: UITableViewDataSource{
    func tableView(_ tableView: UITableView, numberOfRowsInSection section: Int) -> Int {
        …
    }

    func tableView(_ tableView: UITableView, cellForRowAt indexPath: IndexPath) -> UITableViewCell {
        …
    }
}
근데 여러가지 TV를 쓰는 경우 각각의 사용방법이 다르기 때문에 처리를 다르게 해주어야 합니다. 처음 저는 이러한 상황을 맞닥뜨렸을 때 VC, Delegate, DataSource를 상속 받는 새로운 클래스를 생성하여 각각 상황에 맞는 함수 오버라이드를 작성하였습니다.
// MARK: - ProductFunctionCVExtension
class ProductFunctionCVExtension : UIViewController, UICollectionViewDelegate, UICollectionViewDataSource, UICollectionViewDelegateFlowLayout{

    var data: [EfficacyName]?

    func collectionView(_ collectionView: UICollectionView, numberOfItemsInSection section: Int) -> Int {
        …
    }

    func collectionView(_ collectionView: UICollectionView, cellForItemAt indexPath: IndexPath) -> UICollectionViewCell {
        …
    }

    func collectionView(_ collectionView: UICollectionView, layout collectionViewLayout: UICollectionViewLayout, sizeForItemAt indexPath: IndexPath) -> CGSize {
        …
    }
}
그 후 필요한 데이터를 익스텐션 클래스에 넘겨준 후 delegate, dataSource를 해당 클래스에 위임하였습니다.
class ProductDetailVC: UIViewController {

    var productFunctionCVExtension = ProductFunctionCVExtension()
    …

    override func viewDidLoad() {
        …
        initVar()
        …
    }

    func initVar(){

        ProductTapService.shared.productDetailEfficacy(idx: productIdx!){ data in
            switch data {
            case .success(let data):
                let result = data as! [EfficacyName]
                self.productFunctionCVExtension.data = result
                self.productFunctionCV.delegate = self.productFunctionCVExtension
                self.productFunctionCV.dataSource = self.productFunctionCVExtension
                …
            }
        }
        …
    }
}
이렇게 각각 목적에 맞는 TV,CV를 구현할 수 있었습니다.
하지만 이렇게 구현하면서 제가 생각한 문제점이 있었습니다.(물론 문제점이 아닐수도 있지만..)
불필요한 UIViewController의 상속
새로운 클래스를 작성하면서 처음에는 Delegate와 DataSource만을 상속시킨 클래스를 작성하려고 하였습니다. 이러한 공포의 빨간줄.. 이떴는데요.
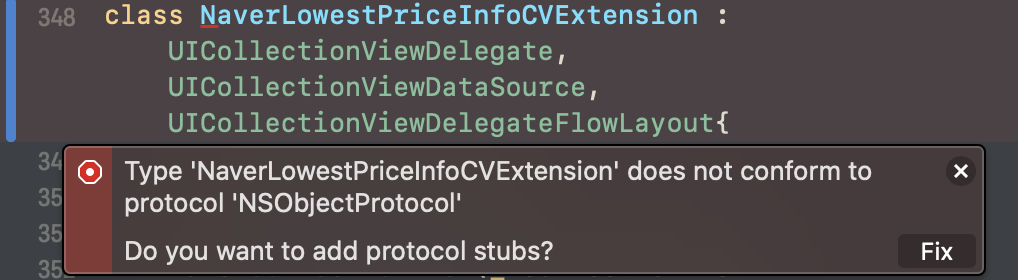
문제점을 검색해보면 대충 Delegate는 NSObjectProtocol의 상속을 받기 때문에 해당 메소드를 오버라이드 해줘야 한다고 합니다.
해결방법 또한 나오는데 NSObject의 상속으로 해결할 수 있다고 합니다.
사실 검색도 안해보고 다른 방법으로 해결한 나의문제 😅
저는 이러한 문제를 빠르게 해결하기 위해서 간단하게 UIViewController를 상속해 줌으로써 넘어 갔습니다. 기존의 Extension 부분을 구현했을 때 기본적으로 UIViewController를 상속받는 클래스의 Extesion으로 구현해 주었기 때문에 이러한 방법으로 넘어 갔었습니다. 그러나 이는 불필요한 상속이라고 생각이 들었습니다. 제가 필요한건 TV, CV delegate의 구현 부분인데 불필요한 기능을 포함한 UIViewController를 모든 클래스에 상속시켜주었으니 상당한 메모리를 소모시킬 수 있습니다.
따라서 저는 이러한 문제점을 해결 시키고 일상적인? 구현 방식을 채택하여 리팩토링 하기로 결정하였습니다.
해결 방법
해결방법은 사실 기존에 계속 구현해왔던 Delegate 등등의 프로토콜 메소드 안에 있었습니다. 바로 이러한 메소드의 첫번째 인자 입니다.
func collectionView(_ collectionView: UICollectionView, cellForItemAt indexPath: IndexPath) -> UICollectionViewCell {
        …
    }
이러한 delegate 메소드들의 대부분에 첫번째 인자로 구현할 컴포넌트들이 들어와 있는 것을 볼 수 있습니다. 이 첫번째 인자는 바로 구현할 CV의 멤버 변수라 할 수 있습니다. 해당 메소드가 동작할 때 메소드의 첫번째 인자를 통해 구현될 CV를 판단하여 동작이 됩니다.
따라서 IBOutlet으로 선언한 CV,TV 의 변수로 해당 메서드를 분기 처리하여 구현해 줄 수 가 있습니다.
// MARK:- CollectionView Extension
// MARK: CollectionViewDataSource Extension
extension ProductDetailVC: UICollectionViewDataSource{
    func collectionView(_ collectionView: UICollectionView, numberOfItemsInSection section: Int) -> Int {
        switch collectionView {
        case productFunctionCV:
            return productFunctionCVExtensionData?.count ?? 0
        case naverLowestPriceInfoCV:
            return naverLowestPriceInfoCVExtensionData?.count ?? 0
        default:
            return 0
        }
    }

    func collectionView(_ collectionView: UICollectionView, cellForItemAt indexPath: IndexPath) -> UICollectionViewCell {
        switch collectionView {
            case productFunctionCV:
                let cell = collectionView.dequeueReusableCell(withReuseIdentifier: "ProductFunctionCVCell", for: indexPath) as! ProductFunctionCVCell
                …
                return cell
            case naverLowestPriceInfoCV:
                let cell = collectionView.dequeueReusableCell(withReuseIdentifier: "NaverLowestPriceInfoCVCell", for: indexPath) as! NaverLowestPriceInfoCVCell
                …
                return cell
            default:
                return UICollectionViewCell()
        }
    }
}
변수로 분기처리를 한 뒤 Cell에 대한 처리를 하면 됩니다.
#iOS/AppJam_회고